
I. Introduction
The art of smoking hookah has been a staple in Middle Eastern culture for centuries, recently gaining popularity worldwide due to its unique and communal experience. However, setting up a hookah can often be intimidating for the novice user. Let's demystify this age-old practice, step-by-step.
Understanding the Basics of Hookah
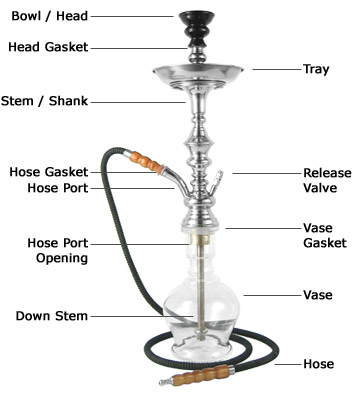
Before diving into the setup process, it's crucial to understand the basic components of a hookah. A traditional hookah setup consists of the following parts:
- Hookah Bowl: Where the shisha (flavored tobacco) is placed.
- Hookah Stem: The vertical tube that sends smoke down into the base.
- Hookah Base: The bottom part of the hookah filled with water, which cools and filters the smoke.
- Hose: Attached to the stem, it's the tube through which you inhale the smoke.
For a more comprehensive understanding of the parts and function of hookah, refer to this useful Wikipedia link.
Benefits of Setting Up Hookah Properly
Setting up your hookah properly is critical for several reasons:
- Improved Smoke Quality: A proper setup can drastically improve the smoke quality, making it smoother and more flavorful.
- Safety: Correctly setting up your hookah ensures that it is safe to use, reducing the chance of accidental tipping or burning.
- Enhanced Experience: A well-assembled hookah adds to the overall smoking experience, making it more enjoyable and satisfying.
In the next section, we will delve into the step-by-step process of setting up your hookah, no matter if you are a beginner or a seasoned pro looking to refine your skills. Stay tuned! [1][2][3][4]
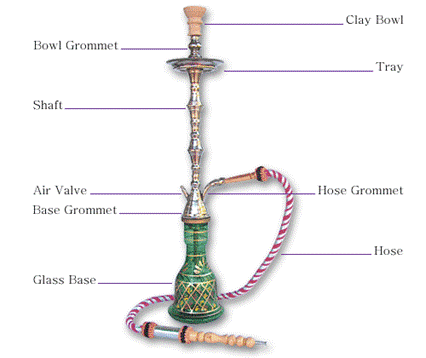
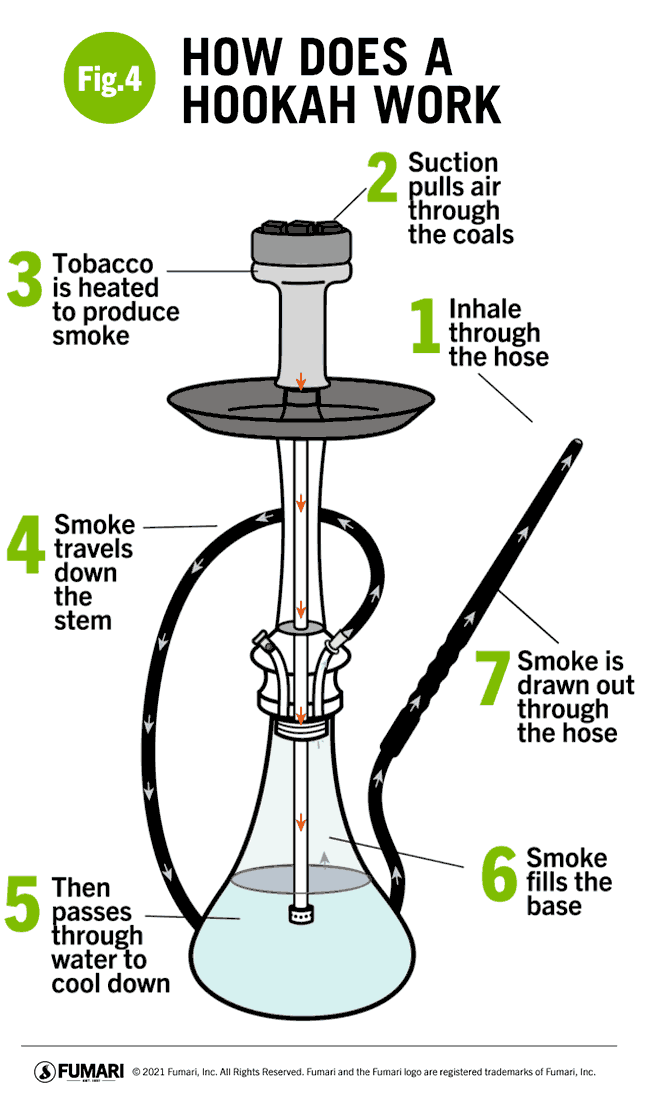
II. Hookah Components
Hookah smoking, a growing pastime across the globe, is an experience that involves product knowledge and a bit of skill. A good starting point, for those interested, is to become familiar with hookah components and the step-by-step process of setting one up. Here, we'll examine the main parts of a hookah and discuss how to set it up properly.
Overview of Hookah Components
A traditional hookah contains several important components, such as:
- Bowl: It holds the tobacco and is typically located at the very top of the hookah.
- Stem: This is a cylinder-shaped part that transfers heat from the coals to the tobacco.
- Base: The large glass container where smoke collects and cools down due to the water kept in it.
- Hose: A tube used to draw the smoke from the hookah.
Role and Function of Each Component
The Bowl: The bowl holds the shisha (flavored tobacco). It is made from a variety of materials, including clay, marble, and even glass. The bowl needs to be packed properly for a smooth smoking experience.
The Stem: This crucial component facilitates the transfer of heat from the coals kept in the bowl to the contents of the bowl. The stem's design plays a significant role in controlling the speed and intensity of the smoke.
The Base: The base contains water, which cools down the smoke that passes through it, allowing you to enjoy smoother and cooler puffs.
The Hose: It is through the hose that you inhale the cooled, flavorful smoke. Hoses can be made from numerous materials, with some luxury models featuring intricate designs and artwork.
As you can see, each component has a unique role in the overall experience of hookah smoking. The next section will further involve each of these components, guiding you on how to properly assemble and set up your hookah. [5][6][7][8]

III. Preparing the Base
The core of any hookah setup, whether for personal use or events, is its base. Here, we'll discuss how to fill the base with water properly and ensure a suitable water level for a premium experience.
Filling the Base with Water
Setting up the hookah base starts by filling it with water. Room-temperature water typically works best, but you can also use slightly chilled water if you prefer cooler smoke. However, avoid using very cold water as it might dilute the flavor of your hookah tobacco.
Ensuring Proper Water Level
The water level in your hookah base is crucial to get right for an optimal smoking experience. A general practice is to submerge the bottom of the hookah stem, or down stem, about an inch deep into the water. This depth may vary based on personal preferences and the type of hookah used.
Here are key points to remember while determining the water level:
- If you prefer a more open draw, meaning less resistance on the smoke, try setting the water level closer to the bottom of the downstem.
- If you favor a more restricted draw, meaning more resistance on the smoke, try setting the water level higher, yet ensuring the downstem is still submerged.
Remember, experimenting with different levels can be part of the process to find the perfect balance that suits your taste best.
Trial and error are expected along the way, but a well-set hookah water level can dramatically enhance your smoking experience, offering a balance of flavor and smoothness. This setup caters to individual preferences, so the 'perfect' level may vary across different users. [9][10][11][12]

IV. Assembling the Hookah
Setting up a hookah involves several steps that include proper cleaning, assembling, and utilization of its various components.
Connecting the Shaft to the Base
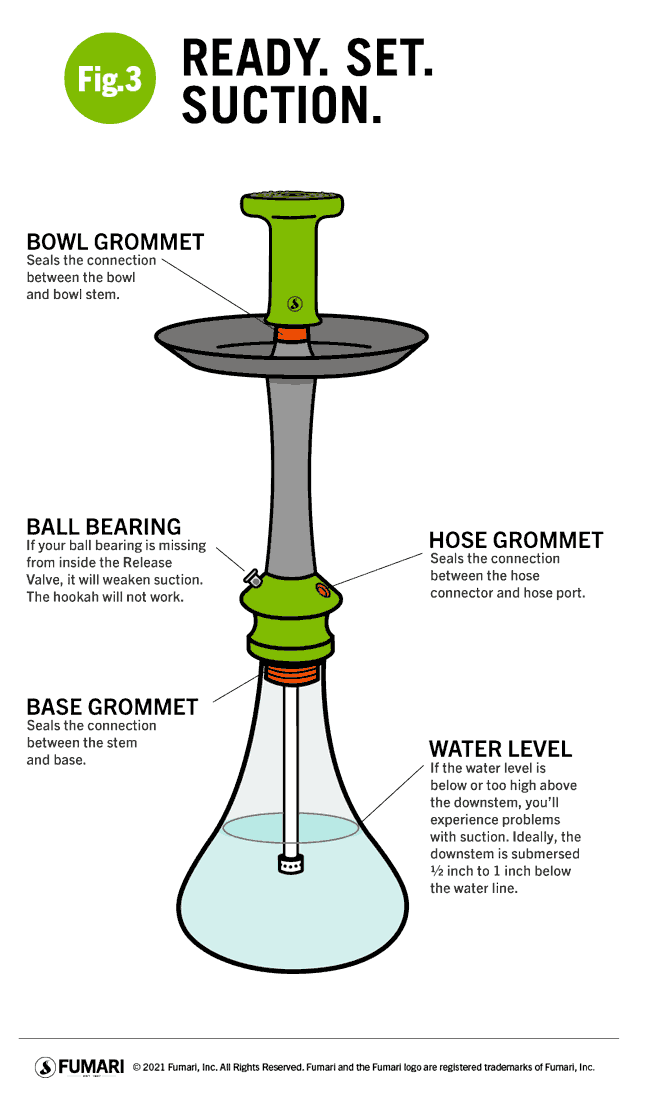
The next crucial step in assembling your hookah entails connecting the Shaft or Stem to the Base. An essential aspect of this is ensuring that the gasket (a rubber seal) is securely attached to the middle of the stem. The gasket ensures your hookah is airtight to prevent any air leaks during use.
- Secure the stem onto the base, verifying a snug fit between the two components.
- If the stem wobbles or moves after being attached to the base, you may need to replace the gasket for a proper fit.
- Temporary solutions, such as wrapping hockey tape around the joint, can provide a sufficient seal in the absence of a gasket.
- If your base is unstable, consider attaching a stabilizing component to ensure a steady and enjoyable hookah experience.
Attaching the Tray and Bowl Grommet
Now, we move on to the Tray and the Bowl Grommet. The purpose of the tray is to catch any falling ash from the bowl. A bowl grommet, on the other hand, seals the connection between the bowl and the stem to prevent smoke from escaping.
- Slide the tray over the top of the stem before connecting the bowl.
- Attach the bowl grommet (a small rubber ring) onto the top of the stem.
- Now place the bowl onto the grommet, ensuring it fits securely without wobbling.
Successfully assembling a hookah requires careful attention to detail and respect for the components to ensure optimal functionality, delivering a pleasurable smoking experience. With a bit of practice, setting up your hookah will become second nature. [13][14][15][16]
V. Packing the Bowl
Setting up the perfect hookah session can be easy if you know what to do, especially when it comes to packing the bowl. The correct process can enhance the flavor and create thick smoke. Here are two essential steps:
Choosing the Right Tobacco
Choosing the right tobacco can be a game-changer. Brands such as Zomo are ideal for novices and experts alike because it tends to be easy to manage due to its lower nicotine content and glycerin level. The tobacco is the perfect balance between wet and dry and can be packed in various ways to ensure a solid hookah session.
Properly Packing the Bowl
Packing the bowl is essential when setting up your hookah. Follow these steps:
-
Remove the tobacco from its packaging. It will likely be clumped together so you will need to mix it with a fork until it becomes fluffy. This process ensures even heat distribution during smoking.
-
Choose a bowl that meets your preferences. In this case, we're using a Russian-made Turkish bowl, known for enhancing flavor and creating thick smoke.
-
Gently place around 15-20 grams of the tobacco in the bowl in a mountain formation.
-
Lightly press the tobacco so that it sits two millimeters below the rim of the bowl if using foil, and 1mm if utilizing a Heat Management Device (HMD).
-
Use a toothpick to poke down directly in the centre, creating a direct hole through the bottom. This enhances airflow and allows uniform heating.
Remember, the density of your tobacco should be even throughout the bowl. Too dense and you risk having poor airflow and uneven cooking. With these steps, packing your hookah bowl for an enjoyable session is straightforward! [17][18][19][20]
VI. Applying Foil or Screen
Setting up a hookah requires an intricate process of managing heat for an optimal smoking experience. This is achieved with the use of foil or a screen, which acts as a barrier between the heated charcoal and the flavored tobacco, known as shisha.
Using Foil or Screen for Heat Management
Aluminum foil or a specially designed metal screen can be used for heat management in a hookah. If using foil, a square piece large enough to cover the top of the hookah bowl is needed. This foil should be tightly wrapped over the top of the bowl, creating a smooth, flat surface. The use of heavy-duty aluminum foil is advised since it's more resistant to the heat produced by the charcoal.
Those who prefer using a screen can find them available for purchase at specialty stores or online. These screens are designed to fit snugly over the top of the hookah bowl, eliminating the need for punching holes and ensuring an evenly distributed heat.
Creating Holes in the Foil or Screen
If using foil for heat management, holes must be created to allow for proper airflow, which is essential for heating the shisha evenly. To do this, use a toothpick, a pin, or a specially designed hookah poker to punch a number of small holes in the foil. The typical approach is to create a pattern of small holes spread evenly across the surface of the foil.
In contrast, if a metal screen is being used, it typically comes pre-perforated and doesn't require any additional modification.
No matter what approach is chosen, proper heat management is key to achieving a satisfying hookah experience.
It's time to get your hookah setup right and enjoy a relaxing smoke session! [21][22][23][24]
VII. Lighting the Coals
The process of lighting your hookah is an essential part of the overall hookah smoking experience. Much of the flavourful and smooth experience hinges on the right selection and lighting of the coals.
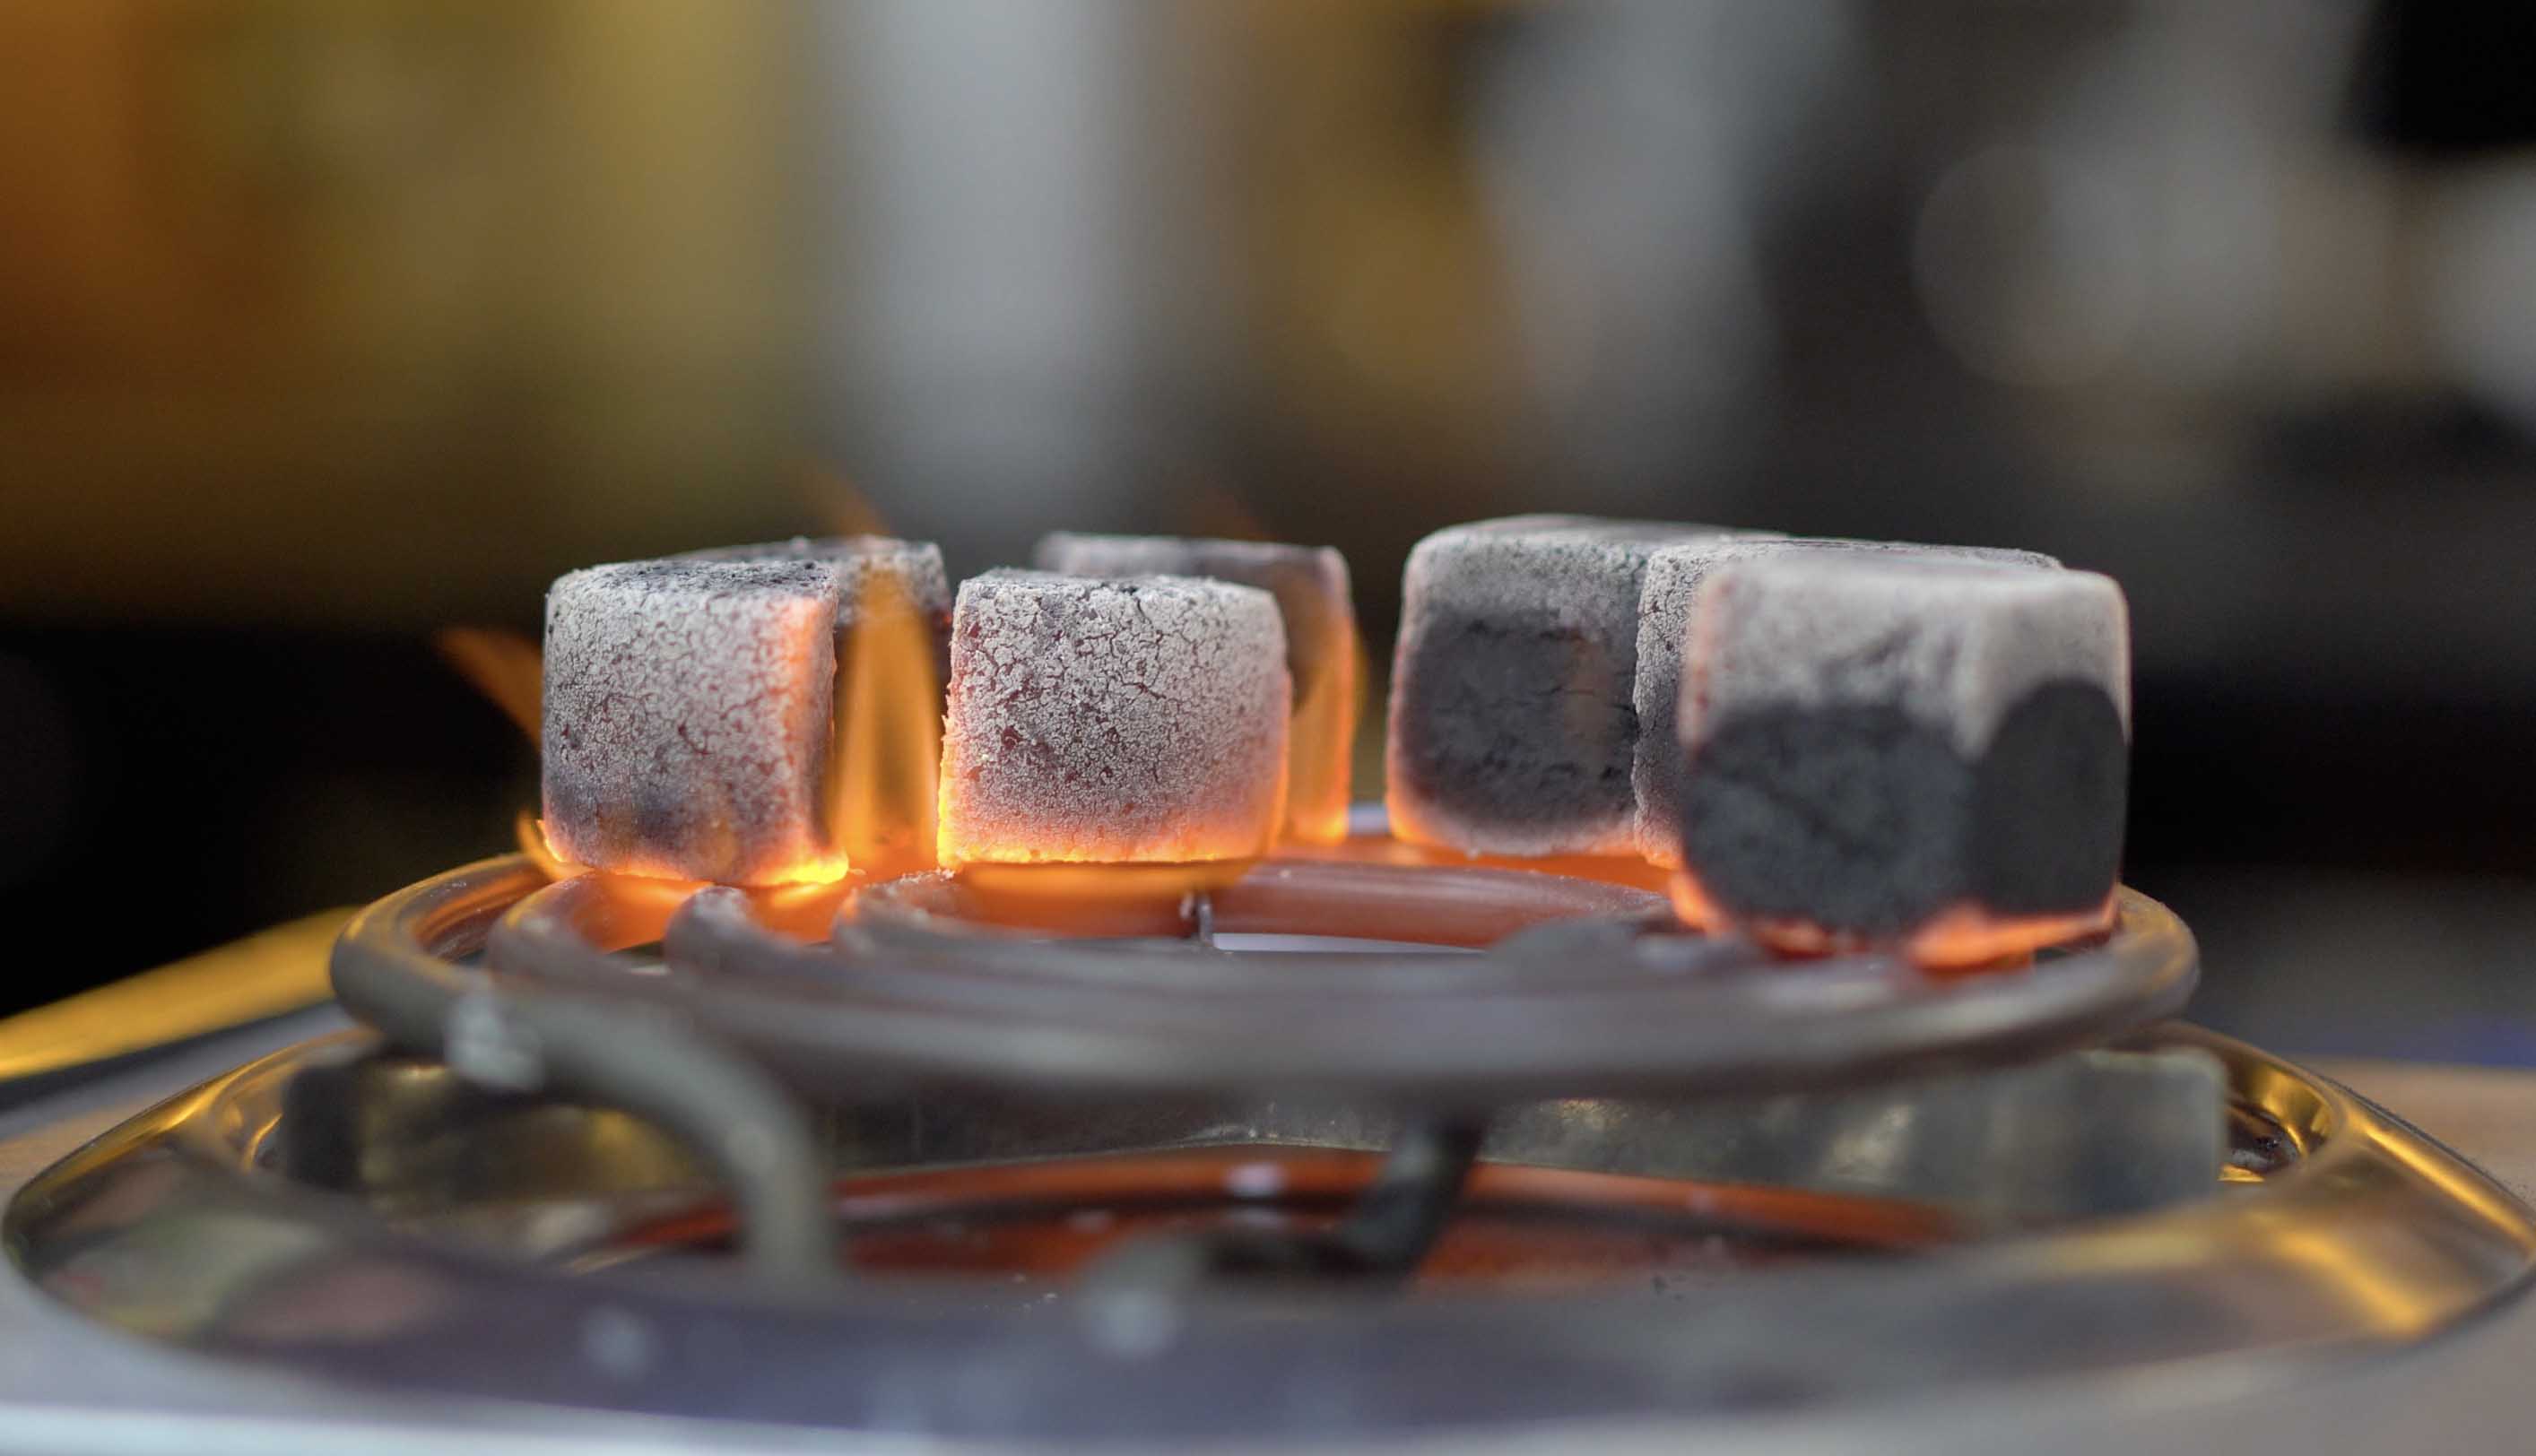
Selecting and Lighting the Coals
Before you light up your hookah, you must decide what type of coal to use. As discussed earlier, there are two main types of hookah coal: Natural Coals and Quick Light Coals. Natural Coals, made from compressed coconut shell husks or bamboo, are more preferred because they burn slower and hotter with no smell or taste, but they do take longer to light. Quick Light Coals, made from a composite of materials like wood sawdust and coconut shells, are easier to light but can alter the taste of your shisha.
When it comes to lighting your coals, you have a few choices:
-
Natural Coals: Conventional wisdom suggests positioning the natural coals directly on an open flame or portable coil burner until they become entirely red/orange and are enveloped by a thin layer of grey ash. Never use an induction stove as it might get damaged.
-
Quick Light Coals: To properly light these coals, merely hold a coal tablet in tongs over a lighter or a struck match. You'll see heating coals spark and possibly smoke somewhat, indicating that it's ready to use.
Placement of Coals on the Bowl
Post lighting, the coal placement requires careful attention. As a rule of thumb, the coals should not directly touch the shisha.
-
Start off by placing your coals on the edge of the bowl or even hanging slightly off the edge. This helps in heating the bowl evenly and slowly, thereby avoiding the shocking of tobacco.
-
If you have two coals, place them across each other; for three coals, form a triangle. This equidistant placement aids in evenly distributing heat.
-
After 10 to 15 minutes, move the coal to an unoccupied space to cook the rest of the bowl more evenly. Drop the coal lightly in the tray to knock off the ash, flip it over, and place it on the fresh spot.
Remember, the key to an enjoyable hookah session lies in heat management. Too hot and it burns the tobacco; too cold, and the volatile components won’t vaporize, resulting in weak smoke or dull flavour. [25][26][27][28]

VIII. Smoking the Hookah
Now that we've set up the hookah like a pro let's get to smoking! Drawing smoke from a hookah may seem complicated, but it's quite straightforward.
Drawing Smoke from the Hose
Test the smoke: After setting up the hookah and lighting the coals, allow the shisha to heat up for a few minutes. Then, slowly start taking a series of short inhales from the hose. Watch for the smoke build-up in the glass base of the hookah.
If the smoke is thick and fully flavored, it means the shisha is heated properly. If not, either give it a little more time or adjust the heat by moving the coals around.
Inhaling the smoke: Once the shisha is ready, start taking slow and steady draws from the hose. The process should be easy and shouldn't require excess strength. If pulling the smoke seems too hard, it may be due to a problem with the setup such as a loose seal or over packing of the bowl.
Exhaling and enjoying the hookah: After drawing in the smoke, exhale slowly to enjoy the dense, white clouds of smoke. Between inhalations, it's best to take occasional breaths of fresh air.
Taking Care of the Hookah After Smoking
Cleaning the hookah: Once the session is over, it is essential to properly clean the hookah. Remove any leftover shisha from the bowl and clear out the ash from the tray.
Maintaining the parts: Disassemble the hookah and clean all parts thoroughly, including the hose, base, shaft, and bowl. If your hose is not waterproof, avoid washing it to prevent damage.
With these steps, not only do you ensure a great smoking experience but also prolong the life of your hookah. So, take a puff, sit back, and enjoy your perfectly set up hookah! [29][30][31][32]
IX. Troubleshooting Common Issues
Typically, a hookah primarily involves both art and science in its setup to achieve the optimal smoke and flavor. However, several common issues could disrupt the smoking experience. This section explores these problems and proposes possible solutions.
Overheating or Burning the Tobacco
Overheating or burning the tobacco is one of the most common issues in hookah smoking. When the coal is too hot, or too close to the shisha, it may burn the tobacco, resulting in a harsh, unpleasant smoke. A couple of tips can help prevent this problem:
- Maintain a safe distance: Ensure that there's room between the heat source and your shisha. This often involves placing the coal near the edge of the bowl, not in the middle.
- Regulating heat: Carefully regulate the heat on your shisha by controlling the number of coals and their placement. Start with less heat and adjust as needed.
- Using a heat management device: A heat management device can help regulate temperature and prevent overheating.
Proper Smoke Production and Flavor
Ensuring proper smoke production and excellent flavor is the crux of an enjoyable hookah experience. However, if you're not getting the desired smoke or flavor from your hookah, here's what you can do:
- Proper packing: Overpacking or underpacking your shisha can lead to poor smoke production or bad taste. Therefore, it's crucial to pack your shisha appropriately for the type of hookah bowl you're using.
- Fresh and high-quality shisha: The type and freshness of the shisha play a significant role in the flavor. Always opt for fresh and high-quality shisha for the better flavor.
- Clean hookah: A clean hookah is essential for good flavor. Residue built up in the hookah can mix with the new shisha and create an unsavory taste. Always make sure to clean your hookah after every session.
Providing solutions to these common issues can enhance the overall hookah smoking experience. It enables both first-time and experienced users to enjoy the full benefits of their hookah sessions. [33][34][35][36]
X. Conclusion
Setting up a hookah might seem daunting due to its complex appearance, but with a bit of patience and understanding on how to properly operate one, it can really enhance your smoking experience.
Importance of Proper Hookah Setup
A proper hookah setup is crucial for a several reasons.
-
First, it ensures that you get the best smoking experience possible. The correct water level, specifically not touching the hose connections, ensures you can easily draw smoke.
-
Second, the right setup protects the hookah and extends its lifespan. Regular cleaning with a soft brush prevents residue buildup and potential damage from accumulated debris.
-
Lastly, setting up a hookah correctly ensures safety. Placing the metal tray on top of the hookah shaft can prevent hot embers from falling and causing potential mishaps.
Tips for an Enjoyable Hookah experience
In addition to the proper setup, there are several tips that can make your hookah experience even more enjoyable:
-
Use cold water in the vase to cool the smoke, resulting in a smoother smoking experience.
-
Change the water in the vase after each smoking session to ensure fresh and clean smoke.
-
Do not overfill the bowl with tobacco. This prevents the tobacco from burning too quickly and causing a harsh smoking experience.
Properly setting up your hookah guarantees not only a safe smoking session, but a more enjoyable one as well. Now, all that's left to do is to sit back, relax, and enjoy your hookah experience! [37][38][39][40]